Monday, July 30, 2012

my super cute dorm shelf | PART TWO


ok, so here's the other half of my super cute dorm shelf post. 


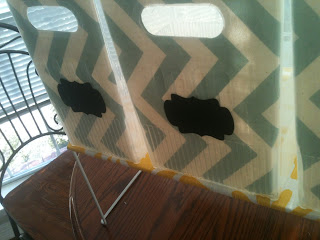
So, here's what I used to make these bins. 


1. These filing boxes from The Container Store (two mediums and one small)

2. This cute chevron fabric from fabric.com 
Premier Prints ZigZag Village Blue/Natural


3. These little chalkboard stickers from an etsy shop


You also need: Mod Podge, scissors, and a pen.


I don't have pictures of how I made this, so I'll just give a recap


  1. lay the fabric face down on the table
  2. lay the face of the bin on the fabric and trace it out. Also, trace the big hole at the top of the bin (I didn't trace the little holes
  3. cut your fabric
  4. DRENCH the face side of the fabric in mod podge
  5. lay the fabric on the inside of the bin and press down.
  6. Once the mod podge dries, put the chalkboard sticker on the front of the bin
Now you're done!


my super cute dorm shelf | PART ONE

This is the first part of my dorm shelf: Creating the actual shelf!

Here's what I used and how much it cost:


This shelf from The Container Store (it's the medium $7.99 one)


This fabric pattern from fabric.com (I bought 1/2 yard for $4, and bought some other stuff too to get free shipping)
Premier Prints Twill Suzani Corn Yellow


Also need: scissors and a glue gun


NOW FOR THE STEPS


STEP 1 | measure/attach your fabric


Just lay your fabric on the shelf (if you bought 1/2 yard like me, it's the perfect width) and cut however much you need. Then, I used paperclips to secure the fabric to the shelf for when I turned it over


STEP 2 | cut the corners


Just snip the corners so your fabric can go around that little bar that's sticking out (I hung the price tag from that bar so you could see it :)


STEP 3 | glue the fabric to the shelf


Pretty much just that. You need to make sure it's nice and taught.


STEP 4 | you're done!


Flip your shelf over. Isn't it so pretty?


Here's the complete shelf with the bins I made as well. CLICK HERE to see how I made the bins!


Thanks for looking!!!

Monday, July 9, 2012

PINTEREST PROJECTS | cheap foam board (neat looking) picture collage

First off, let me start by saying this THIS PROJECT WAS NOT MY IDEA! I am simply sharing with the world that non-crafty people CAN do successful projects they find on pinterest. The original blog post can be found here: http://blog.bitsofeverything.com/2011/04/wall-picture-collage.html


So, without further ado, here's how I made my collage that I will proudly display in my dorm room this fall:


1. GET THE SUPPLIES | it's super cheap!
You need:

  • Mod Podge (I bought a new bottle at Wal-Mart for $8)
  • Foam brushes (Wal-Mart --> $1)
  • Double sided tape (I had at home, but they have it at Dollar Tree for $1)
  • Black Foam Board 20" x 30" (Dollar Tree, $1)
  • 48 pictures (My mother keeps boxes of pictures, so I mostly used those. For the rest, I had a free coupon for CVS.com, so my pictures cost me $0.00
  • Paper cutter (I bought mine years ago from Hobby Lobby. Maybe $20? Always remember to print your 40% off coupon from Hobby Lobby before you go!)
Though it will be a bit different for everyone, this project cost me $11 total!


2. GET YOUR PICTURES
If you're using 2 20" x 30" foam boards, you will need 48 pictures. Go to different websites like CVS, Walgreens, Wal-Mart, and shutterfly. They're always having introductory deals if you sign up. 

3. CUT YOUR PICTURES
I cut all of my pictures to 4" x 4" because there is space for 48 5" x 5" boxes on the foam boards.

4. MEASURE OUT YOUR FOAM BOARDS
I used a measuring tape and made a little tick mark with black sharpie (so it's almost invisible)

5. PLACE AND TAPE EACH PICTURE

6. GO TO TOWN WITH THE MOD PODGE
Don't worry! It's scary at first because the mod podge is all white, but it dries clear :) In the second pictures, you can see it starting to dry clear. In case you were wondering, I got the matte mod podge (the one in the yellow bottle)

7. HANG ON YOUR WALL...YOU'RE DONE! 
I've just hung it in my bedroom at home for right now, but I feel like I'm 1 step closer to covering up those nasty cinderblock dorm room walls


EXTRA: I made each column a different year, so from years 2001-2012. Then, I printed labels for each year, stuck them on, and Mod Podged over those. So when I go to college I won't forget my childhood :(