Sunday, September 23, 2012

decorating the dorm door!

I've been at UT for about a month now, and it still really doesn't feel like home. It feels reminicent of summer camp, and my body thinks it's time to pack up and go back home to mommy and daddy - even though I've got a wayyys to go. SO, in an effort to make myself feel more at home, I have begun re-decorating my already pretty cute dorm piece by piece. 


TODAY IT WAS THE DOOR. I'll just tell you - it was ugly before. There was a nasty bulluten board cemented to the door that couldn't go, so I just covered it up. It just looked so bare. After all - this is my home! My mommy puts a wreath on our front door in Plano, and since this is my front door, it got a wreath :)

STEP ONE | the wreath 

Ingredients: 
  • 14"-16"ish foam wreath from Hobby Lobby ($4.99 - 40% coupon = $2.99)
  • Yarn from Hobby Lobby (on sale for $2.66)
  • Little triangle pennets that I printed with some cardstock I had
  • Little scraps/strips of fabric to make the fabric flowers/rosettes that I had
  • 1/4" satin ribbon that I had
  • Hot glue and a glue gun that I had
    • TOTAL COST: $5.65!
Steps:
  1. Wrap your yarn around your wreath. It's really quite self explanitory, I tied the yarn in a tight knot around the wreath to get me started, then I just wrapped and wrapped and wrapped and wrapped and wrapped till 45 minutes later I was done. You need to overlap a little bit, just so that no part of the white foam is showing.
  2. Make your flowers. I made them from two tutorials.
    1. Rosettes   
    2. Flowers (this is really a headband tutorial but I just followed the flower part)
  3.   Hot glue the flowers onto the wreath
  4. Make your little triangles with letters on the computer. Print out on cardstock and cut them out
  5. Hot glue them to the ribbon
  6. Hot glue the ribbon (with triangles added on at this point) to the back of the wreath
  7. Thread the ribbon through a piece of yarn on the back of the wreath and tie a knot. Then I just swung the ribbon over the door and thumbtacked it on the inside of the door
STEP TWO | message board

I just took a piece of fabric that I had (24" x 18" and stapled it to that ugly bulliten board. Then, I used command strips to attach the board to the fabric. Then, I repeated steps 4 & 5 of the wreath tutorial to make the 'leave a message' banner. I thumbtacked it to the board.

and.....DONE!

Beginning to feel more at home? possibly :)

Monday, July 30, 2012

my super cute dorm shelf | PART TWO


ok, so here's the other half of my super cute dorm shelf post. 


So, here's what I used to make these bins. 


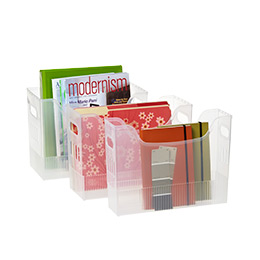
1. These filing boxes from The Container Store (two mediums and one small)

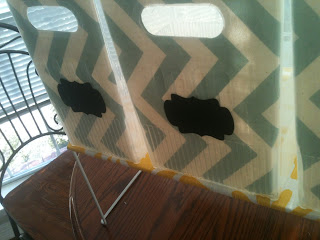
2. This cute chevron fabric from fabric.com 
Premier Prints ZigZag Village Blue/Natural


3. These little chalkboard stickers from an etsy shop


You also need: Mod Podge, scissors, and a pen.


I don't have pictures of how I made this, so I'll just give a recap


  1. lay the fabric face down on the table
  2. lay the face of the bin on the fabric and trace it out. Also, trace the big hole at the top of the bin (I didn't trace the little holes
  3. cut your fabric
  4. DRENCH the face side of the fabric in mod podge
  5. lay the fabric on the inside of the bin and press down.
  6. Once the mod podge dries, put the chalkboard sticker on the front of the bin
Now you're done!


my super cute dorm shelf | PART ONE

This is the first part of my dorm shelf: Creating the actual shelf!

Here's what I used and how much it cost:


This shelf from The Container Store (it's the medium $7.99 one)


This fabric pattern from fabric.com (I bought 1/2 yard for $4, and bought some other stuff too to get free shipping)
Premier Prints Twill Suzani Corn Yellow


Also need: scissors and a glue gun


NOW FOR THE STEPS


STEP 1 | measure/attach your fabric


Just lay your fabric on the shelf (if you bought 1/2 yard like me, it's the perfect width) and cut however much you need. Then, I used paperclips to secure the fabric to the shelf for when I turned it over


STEP 2 | cut the corners


Just snip the corners so your fabric can go around that little bar that's sticking out (I hung the price tag from that bar so you could see it :)


STEP 3 | glue the fabric to the shelf


Pretty much just that. You need to make sure it's nice and taught.


STEP 4 | you're done!


Flip your shelf over. Isn't it so pretty?


Here's the complete shelf with the bins I made as well. CLICK HERE to see how I made the bins!


Thanks for looking!!!

Monday, July 9, 2012

PINTEREST PROJECTS | cheap foam board (neat looking) picture collage

First off, let me start by saying this THIS PROJECT WAS NOT MY IDEA! I am simply sharing with the world that non-crafty people CAN do successful projects they find on pinterest. The original blog post can be found here: http://blog.bitsofeverything.com/2011/04/wall-picture-collage.html


So, without further ado, here's how I made my collage that I will proudly display in my dorm room this fall:


1. GET THE SUPPLIES | it's super cheap!
You need:

  • Mod Podge (I bought a new bottle at Wal-Mart for $8)
  • Foam brushes (Wal-Mart --> $1)
  • Double sided tape (I had at home, but they have it at Dollar Tree for $1)
  • Black Foam Board 20" x 30" (Dollar Tree, $1)
  • 48 pictures (My mother keeps boxes of pictures, so I mostly used those. For the rest, I had a free coupon for CVS.com, so my pictures cost me $0.00
  • Paper cutter (I bought mine years ago from Hobby Lobby. Maybe $20? Always remember to print your 40% off coupon from Hobby Lobby before you go!)
Though it will be a bit different for everyone, this project cost me $11 total!


2. GET YOUR PICTURES
If you're using 2 20" x 30" foam boards, you will need 48 pictures. Go to different websites like CVS, Walgreens, Wal-Mart, and shutterfly. They're always having introductory deals if you sign up. 

3. CUT YOUR PICTURES
I cut all of my pictures to 4" x 4" because there is space for 48 5" x 5" boxes on the foam boards.

4. MEASURE OUT YOUR FOAM BOARDS
I used a measuring tape and made a little tick mark with black sharpie (so it's almost invisible)

5. PLACE AND TAPE EACH PICTURE

6. GO TO TOWN WITH THE MOD PODGE
Don't worry! It's scary at first because the mod podge is all white, but it dries clear :) In the second pictures, you can see it starting to dry clear. In case you were wondering, I got the matte mod podge (the one in the yellow bottle)

7. HANG ON YOUR WALL...YOU'RE DONE! 
I've just hung it in my bedroom at home for right now, but I feel like I'm 1 step closer to covering up those nasty cinderblock dorm room walls


EXTRA: I made each column a different year, so from years 2001-2012. Then, I printed labels for each year, stuck them on, and Mod Podged over those. So when I go to college I won't forget my childhood :(


Sunday, April 29, 2012

10 things you MUST have in your dorm closet from The Container Store

Here is my complete list of everything I need for my dorm closet. While keeping space saving in mind, this is a complete list of everything I need to store everything I have. From shoes to belts, scarves, jewelry and clothes. I hope this helps you pick out what you need for your dorm closet!


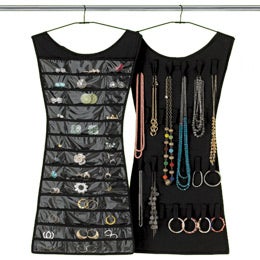
1. Little Black Dress Hanging Jewelry Organizer by Umbra - $19.99


2. Flip Flop and Sandal Holder - $12.99


3. 30 Pair Overdoor Shoe Organizer - $29.99


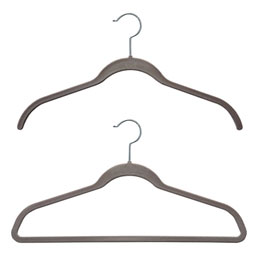
4. Huggable Hangers - $9.99 for a 10 Pack (x 6)
I'm OBSESSED with my hangers all being the same, so I bought a ton from Ikea ($0.05 each!) but they're plastic and the clothes slide off, which contributes to my messiness! So these will all match, and clothes won't fall off. I'm gonna need a lot of these...


5. Huggable Tie and Belt Hanger - $4.99 each
Speaking of matching hangers, huggable makes a tie and belt (or in my case, scarf and belt) hanger to match my already all matching hangers!


6. Huggable Ultra Slim Finger Clips - $4.99 for a 10 pack (x 2)
To go along with the huggable trend, these are little clips you put on your huggable hangers so you can hang pants, shorts, and skirts!


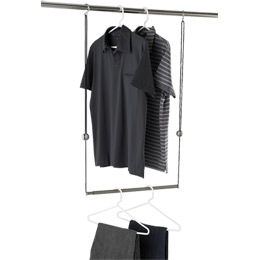
7. Dublet Adjustable Closet Rod Expander by Umbra - $19.99


8. Milano Handbag Storage Bin - $21.99


9. Large Black Open Bin - $19.99

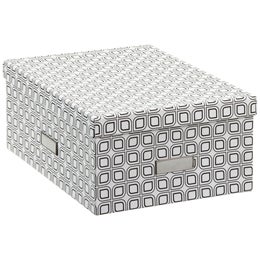
10. Milano Graphic Shirt Box - $14.99 (x 2)


All of these things bring me to a grand total of $229.83. YIPES!!! This may seem daunting, but there's good news ahead. Container Store has graduation registries, so you can put everything you want on a registry, just like most stores have for weddings and if you're having a baby. I feel like this is an equally important event, and a new chapter in life, just like a marriage or baby, so I fee justified in saying I DESERVE A REGISTRY! 


Stay tuned for more posts about other things I need for college. (I'm not greedy, I'm just thinking ahead on how to be prepared...)

Tuesday, March 27, 2012

THE ART OF WEDDING EMERGENCY BAGS | how to make the world's most magnificent oh sh!t kit

As you may or may not know, I work at a wedding planning company. I have worked at dozens of weddings over the past couple of years, and every time I go to work, or anywhere for that matter, I bring my WEDDING EMERGENCY KIT. This kit is an adorable Vera Bradley 'Vera' Bag filled with everything anyone could ever possibly need ever in their lives. Since a wedding is the most important day of a girl's life, it only makes sense to have everything anyone could ever possibly need ever in this one bag. 


Today I'm going to reveal to you what is in my wedding emergency kit, how to use it, and what to do with it after the wedding. 


My wedding emergency kit consists of 9 different categories, each having it's own smaller bag filled with important stuff. I've broken down each category and included a picture and list of each category, as well as the completed bag. Here goes:


category 1 | FIRST AID KIT

  1. Medicines
    1. Ibuprofen (aka Advil or Aleeve) you could also use asprin or tylonel if that's what you prefer
    2. Benadryl for those outdoor or weddings
    3. Halls cough drops or throat lozenges
    4. TUMS or pepto bismol, but I prefer tums because pepto bismol is so gross! 
  2. Johnson and Johnson First Aid To Go! Kit (costs $1 at Wal-Mart in the trial sized section) It contains:
    1. 6ish bandaids of varying sizes
    2. antibiotic ointment (like neosporin)
    3. gauze pads
    4. antiseptic wipes
The finished first aid kit zip-lock baggie looks like this!

category 2 | WARDROBE MAINTENANCE
  1. Sewing kit
    1. I bought my sewing kit from Market Street, a grocery store chain in Texas, and it includes 14 colors of threas, mini scissors, needles, safety pins, a needle threader, a thimble, buttons, and a tape measurer
  2. Shoe Shine Wipes - just in case your groom scuffs his shoes before your big first dance
  3. Tide to go - because Tide to go is Jesus. And everybody wants Jesus to be at their wedding
  4. A lint roller


category 3 | THE NAIL BAG
  1. nail polish remover
  2. cotton balls and q-tips
  3. emory board
  4. nail clippers
  5. nail polish - particularly the color you are wearing on your toes/fingers at your wedding
  6. top coat
  7. extras but not required
    1. those little manicure scissors
    2. those little clippers the manicure people use to clip the skin around your nails
    3. the little wooden stick to push your cuticles down
Below is all of the contents of the nail bag

Below is a picture of everything in the nail bag. I use a nail kit that I got while on vacation in England. It was from a store owned by the same company as TJ Maxx. TJ Maxx and Marshalls both always have really cute/cheap nail kits like this, or you can just build your own with the list I made above. 

category 4 | FEMININE HYGIENE BAG
  1. pads
  2. tampons
  3. pantyliners (I LOVE U by Kotex the best for this purpose because they're soooo thin)

category 5 | ORAL HYGIENE BAG
  1. mouthwash
  2. dental floss
  3. mini toothpaste
  4. mini toothbrush

category 6 | HAIR BAG
  1. bobby pins
  2. hair rubber bands
  3. comb
  4. brush
  5. hairspray
category 7 | THE MAKE UP BAG
  1. eye liner
  2. mascara
  3. eye shadow
  4. concealer
  5. foundation
  6. powder!!!
  7. lip stick/lip gloss

category 8 | THE LITTLE RANDOM STUFF BAG
  1. wet ones - I'm cheap, so I bought the store brand. But it doesn't really matter 
  2. tic tacs - we always pass out mints to the bridal party right before the ceremony. Just something to wake them up and give them fresh breath
  3. super glue - I almost garuntee you will use this. Every wedding, I always use super glue. And it's always for something different. 
  4. kleenex - for allergies. and for when you cry your eyes out. 
  5. hand sanitizer (unless you have wet wipes that kill germs)

category 9 | THE RANDOM STUFF THAT DOESN'T GET A BAG
  1. scissors - big hefty scissors, if you have any
  2. glue gun - you never know
  3. hair spray (or you could get a little mini hairspray to go in the hair bag)
  4. lighter - for lighting candles or sparklers at the end of the night
  5. packing tape and/or duct tape - i happen to have cool patterned duct tape because it was on sale at michaels. but regular duct tape might be more practical
  6. sunscreen and bug spray - pretty much for outdoor weddings only

category 10 | OFFICE SUPPLIES


  1. paperclips
  2. pens
  3. pencils
  4. sharpies
  5. highlighter
  6. scotch tape

Now for the complete printable list: CLICK HERE!

Pin this picture when you're done reading! Click HERE to pin!

Friday, March 16, 2012

I'M NOT JUST AN ACTIVIST | misconceptions about the war in uganda

This is my first post. I'm excited that my first post is about all this Joseph Kony chaos that has played out over the past few weeks. As you may or may not know, I have been working since 9th grade to raise awareness about Joseph Kony, the war in Uganda, and mostly Schools for Schools, a division of Invisible Children. I want so badly for people to understand the war in Uganda. People need to be informed about every detail of this war, and what that Joseph Kony video is really about. So here are the top four misconceptions about the war in Uganda, and their explinations:


M I S C O N C E P T I O N  O N E | by sending troops to uganda, we're going to start another iraq or afghanistan


T R U T H | the war in iraq had about 1000 times the number of initial troops sent, and the soldiers deployed to central africa are not there to be engaged in combat


Here's the most informative, non-biased article that I could find on the matter: CLICK HERE
First of all, Obama sent a very small number of troops to central africa, and that number will eventually grow to 100. When the war in Iraq started, the initial plans were to send 130,000 troops to Iraq (globalsecurity.org). Also, you have the understand that while these troops are combat equipped, they are not in Africa to be in direct combat with the Lord's Resistance Army. OF COURSE they're combat equipped. It would be a dumb move to send 100 ill-equipped, unprepared Americans over to one of the most volatile regions on the planet. It's only for their own security and self defense that they're combat equipped, so that they don't die (not to oversimplify anything, but it's pretty much as simple as that). President Obama said, "although the U.S. forces are combat-equipped, they will only be providing information, advice, and assistance to partner nation forces, and they will not themselves engage LRA forces unless necessary for self-defense". 


M I S C O N C E P T I O N  T W O| joseph kony is only in uganda


T R U T H | joseph kony's army is in parts of uganda, south sudan, the central african republic, and the democratic republic of congo


I try my hardest to use unbiased sources, but Invisible Children actually has a pretty good LRA tracker that they've invested TONS of money in. I feel like it's less biased because it's not used for propaganda purposes, it's an actual alert system used for citizens of the countries affected by the LRA. According to the most recent sightings, most LRA activity is happening on the border of the Democratic Republic of the Congo, and Sudan (lracrisistracker.com). 


M I S C O N C E P T I O N  T H R E E | there's more important people we need to be looking for than joseph kony


T R U T H | joseph kony is the #1 war criminal on the international criminal courts most wanted list


That's right. Some of you might have seen that video posted by Invisible Children about the International Criminal Court. According to an article by Beth Rowan, "In 1998 the UN General Assembly voted to authorize a treaty that established a permanent international court to try those accused of war crimes, genocide, crimes of aggression, and crimes against humanity" (infoplease.com). This is what the ICC, or International Criminal Court is. At the very tippy top of their list is Joseph Kony. While there are a lot of bad people in the world, there's no way that we can stop all of them. Sadly, tragically, unfortunately, there's just no way. If we tried, we'd just end up arresting nobody, and we'd be worse off than when we began. So, we need to pick one person at a time to focus on, so we can begin to make progress. I believe that Joseph Kony is the person to pursue because not only has he fueled the Africa's Longest Running War in History, but he's also number one on the list. That just sounds like a good benchmark to me. We've gotta start somewhere, why not at the top?


M I S C O N C E P T I O N  F O U R | invisible children is lying, oversimplifying, and keeping all of the money for themselves


T R U T H | invisible children may have oversimplified some things, but they are definitely not keeping all of the money for themselves


First off, here's what Jason Russell, co-founder of Invisible Children, had to say about the 'oversimplification' allegations, "It definitely oversimplifies the issue. This video is not the answer, it’s just the gateway into the conversation. And we made it quick and oversimplified on purpose...We are proud that it is simple. We like that. And we want you to keep investigating, we want you to read the history" (dawn.com). I guess this makes sense. If you tell people every little detail of the entire history of this conflict, it would take 1853ish hours, nobody would watch it, and it would make people's brains hurt. Looking at the situation with an open mind, I guess I can forgive them for oversimplifying things. Secondly, I would like to note that on Invisible Children's website, they have detailed financial reports from every year since 2006, including detailed summaries, tax documents, and more. It's incredibly illegal to fabricate this, so I'm pretty sure it's true. On this web page, Invisible Children states that only 16.24% of what they bring in goes to 'management and general', so salaries and the offices and stuff like that. This is an incredibly good statistic. I promise you, they're not taking your money. 


Pin this picture onto pinterest when you're done reading this article!!!
Click HERE to pin!


*Anything not directly cited is from the article that I mentioned at the very top of this post, which can also be found here